Video Processing
The EyesOnIt Web UI allows you to configure monitoring and alerting for video streams. Video monitoring builds on the concepts introduced with image processing and adds other concepts like frame rates, motion detection, object tracking, alerting and notifications. To access the video monitoring features, click on the Video link in the EyesOnIt Web UI home page.
The Stream List
When you first enter the EyesOnIt Video Monitoring and Alerting page, you will see the stream list.

The stream list is where you perform high level operations with streams. To add a new stream, click the  button next to the Stream List heading.
You can add, delete and edit stream configurations through the stream list. You can also start and stop monitoring and view the current frame from the stream.
Once you add a stream, it will appear in the list.

The Stream List includes the following columns:
Stream Name - the name of the stream that you provide in the Stream Settings UI
Status - the stream status, which will be:
-
idle - not being monitored
-
monitoring - being monitored but an alert has not been triggered
-
alerting - being monitored and the is an active alert
Actions - icons for the available actions:
 Start monitoring the video stream
 Stop monitoring the video stream
 Delete the video stream
 Edit the video stream settings
 View the current frame of the video stream
Alerts
Alert images appear below the stream list. For each alert, EyesOnIt shows the time, detection region, alert conditions, object description and detection confidence. The EyesOnIt Web UI only shows the last ten alerts.

Setting Up Stream Monitoring and Alerting
When you add a new stream, the EyesOnIt Web UI allows you to configure monitoring and alerting so you can be notified about events of interest. You can start this process by clicking the Video link in Web UI home page, then clicking the  button on the EyesOnIt Video Monitoring and Alerting page.
Adding a stream for monitoring and alerting requires a few simple steps:
-
add the stream using the RTSP URL and retrieve a preview image
-
create one or more detection regions with their associated settings
-
specify your notification options
This section describes these steps.
Adding the Stream
When configuring a new stream, the first step is to provide basic stream information. For this step, make sure Stream Settings is selected in the menu on the left side of the page. EyesOnIt needs the following information:
Stream name - this is your friendly name for the stream. The friendly name is used in notifications to help you know the area where the alert was triggered. It’s good to keep this name to 40 characters or less.
Stream URL - this is the RTSP URL that EyesOnIt uses to access your video. After entering the RTSP URL, you can click the  button to get a preview frame from the camera. If EyesOnIt does not return a preview frame within five seconds, verify the RTSP URL. It can be helpful to use a tool like VLC Media Player to verify an RTSP URL.
Frame Rate - The last item needed to add a stream is the desired processing frame rate. This is a number from one to 30. Don’t set this number higher than you need for accurate object and motion detection.
With these settings entered, the Web UI will look something like this:
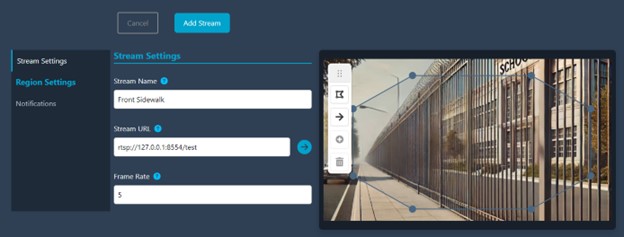
When the preview frame is returned, EyesOnIt will also create the default detection region and draw that on top of the preview frame. We’ll discuss the detection region settings in the next section.
Configuring the Detection Region
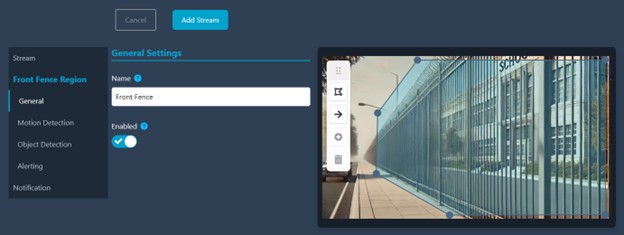
To configure the detection region, select General under the Region Settings menu.
EyesOnIt will automatically generate a default detection region for you when you get the preview frame from your RTSP URL. You can modify the default region and add additional regions as necessary.
To complete the region general settings, set the following:
Name - a friendly name for the region. This name will be used in notifications. It’s good to keep this name to 40 characters or less.
Enabled - a flag indicating whether EyesOnIt should perform motion and object detection within this region. This can be useful if you want to temporarily disable detection in a region without losing the other settings for that region.
With these settings entered, the Web UI will look something like this:
Setting Up Motion Detection
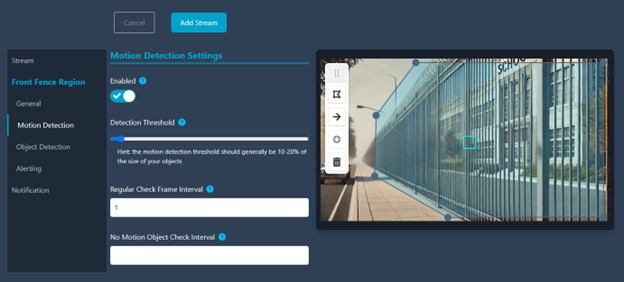
To configure motion detection for your detection region, select Motion Detection in the Region Settings menu.
Motion detection helps EyesOnIt make efficient use of your computing resources by only performing detection when there might be something of interest to detect. To configure motion detection, set the following:
Enabled - by default, motion detection is enabled and just needs to be configured. Uncheck this box to disable motion detection. When disabled, EyesOnIt will look for objects within your detection region at the interval specified by the stream frame rate. This will consume significantly more computing resources than using motion detection would.
Detection Threshold - this slider sets the size of the motion detection threshold. A blue box appears over the image to indicate the area of the motion detection threshold. When processing video, motion detection regions will not be square. The area of the motion detection threshold is important, but the shape is not.
Regular Check Frame Interval - sets the interval between frames for motion detection.
No motion Object Check Interval - sets the interval between object detection when not motion has been detected. This can be blank if this feature is not needed.
This image shows the Web UI with these settings entered:
Configuring Object Detection
To configure object detection, select the Object Detection menu item in the Region Settings menu. The object detection settings are as follows:
Object Type - under the “What do you want to detect?” label, select the type of object you want to detect. You can either select one of the specific types provided, or you can select Something Else. If you select Something Else, you will need to use object descriptions to specify what you want to detect. If you select a specific object type, object descriptions are optional, but are often helpful to provide more detail about what you want to detect.
Object Size - use the object size slide to specify the estimated size of the object you want to detect. The Web UI will draw a box over the preview image to show the selected size. Keep in mind that EyesOnIt will select objects from 25% to 200% of the size of the specified object size.
Object Descriptions - you can add one or more object descriptions as English text to tell EyesOnIt specifically what you want to detect. For each description, you’ll need to provide the following:
Text - the English text that describes what you want to detect. This should typically be names or descriptions of objects. For example, if your object type is “vehicle”, you may enter “blue sedan” or “yellow dump truck” as your object description.
Background Description - check this box to indicate that the object description describes objects that may be in the background. This helps EyesOnIt distinguish the objects you care about from anything in the background of the image or video. EyesOnIt will not send an alert if it only detects the background, so the Alert and Alert Threshold settings will be disabled when this box is checked.
Alert - check this box to indicate that you want EyesOnIt to send an alert for this object description. EyesOnIt will use the Alert Threshold along with settings in the Alert Conditions section to determine when to send alerts.
Alert Threshold - the Alert Threshold is the minimum confidence level that EyesOnIt must observe for the associated object description before it will send an alert. EyesOnIt will also use settings in the Alert Conditions section to determine when to send an alert.
The image below shows an example of the settings for an object description.
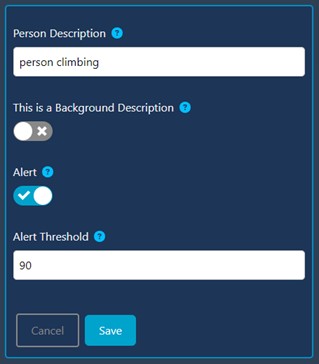
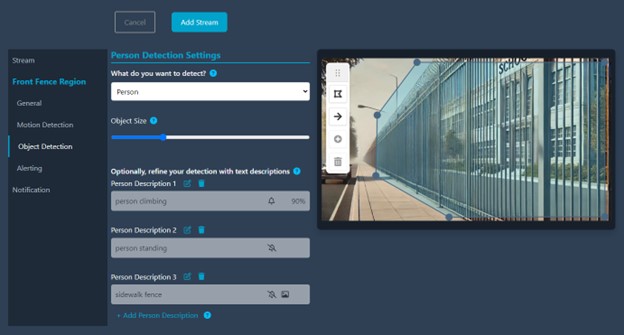
The following image shows the settings to alert when a person is detected climbing the fence. With this example, EyesOnIt will detect people that are between 25% and 200% of the size of the blue square. For each person detected, it will determine if the person is climbing or standing. Using the settings shown, EyesOnIt will only send an alert if a person is climbing the fence.
Creating Boundary Lines
In addition to detection regions, you can define boundary lines to detect when an object crosses that line. To add a boundary line, click the ![]() icon in the preview image toolbar.
icon in the preview image toolbar.
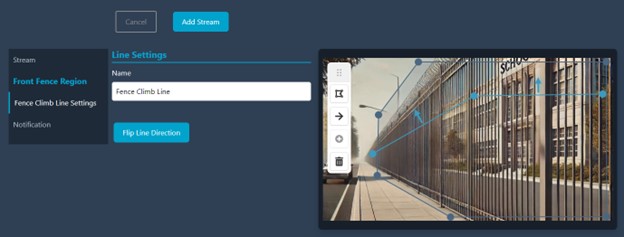
Give your line a friendly name so you can reference it in the Alert Conditions settings. As with other names, it’s good to keep this name under 40 characters, as it will be used in the alert text when an object crosses the line.
As shown below, you can add a vertex to a line in the same way as you add a vertex to a polygon. Just click a line segment and then click the ![]() icon on the preview image toolbar.
icon on the preview image toolbar.
You will notice the arrows associated with each line segment. You can flip the direction of these arrows by clicking Flip Line Direction.
Using Alert Conditions
Alert conditions allow you to provide additional configuration that applies to all object descriptions in the current detection region. To specify alert conditions, select the Alert Conditions menu item under Region Settings and complete the settings described below:
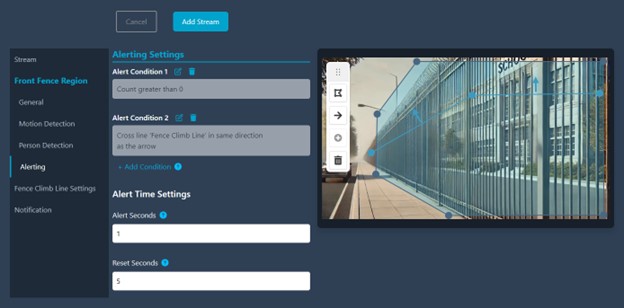
Alert Condition: You must add at least one alert condition for EyesOnIt to send an alert. Because an alert condition is required, EyesOnIt provides a default alert condition to alert if the object count is greater than 0. In other words, if any object is present, EyesOnIt will send an alert. You can either modify the default alert condition or delete it and create another alert condition.
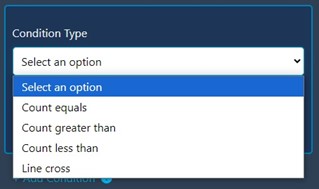
When you create a new alert condition, you will first choose the condition type. EyesOnIt supports count and line cross conditions.
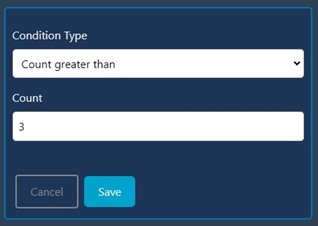
For a count condition, you will need to enter the reference count and then hit Save. In this example, EyesOnIt will alert when the count of objects is greater than three.
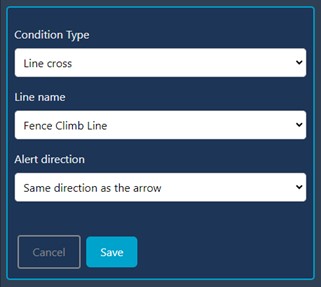
For a line cross condition, you will need to specify the line name and alert direction and then hit Save. With the settings below, EyesOnIt will alert when an object crosses the Fence Climb Line in the same direction as the arrow.
Alert Seconds - specifies the number of seconds during which the following must be continuously true before EyesOnIt sends an alert:
- The confidence level for at least one object description where alerts are enabled is above the associated alert threshold
- At least one alert condition is satisfied
Reset Seconds: specified the number of seconds after an alert is sent that at least one of the following must be continuously true before EyesOnIt will consider sending another alert:
- The confidence level for at least one object description where alerts are enabled is below the associated alert threshold
- No alert condition is satisfied
With these settings entered, the Alert Conditions section of the Web UI will look similar to this:
Configuring Notifications
To configure notifications, select on the Notification menu item.
The EyesOnIt Web UI supports text message notifications. These notifications can optionally include an image of the detected object. You can use these options to configure notifications:
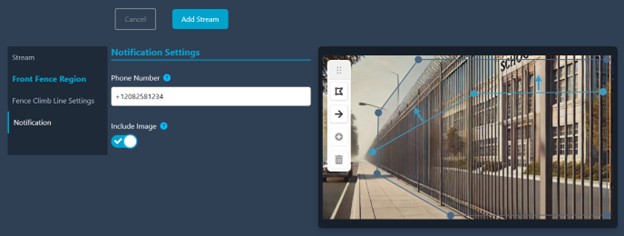
Phone Number - enter a phone number in the format of <country code><number> without spaces or special characters besides the beginning +. In the example below, the country code is +1 for US and Canada. The number is (208) 258-1234. If you do not want to receive text message notifications, leave the phone number blank.
Include Image - check this box to include an image of the detected object in the notification. This option is only used if a valid phone number is provided.
Submitting the Stream Configuration
Once you have set all the settings for your stream, click Add Stream to send the settings to EyesOnIt. If you decide you don’t want to add the stream, you can click Cancel instead.
After clicking Add Stream, the Web UI will notify you if any of your inputs are invalid. If all the inputs pass validation, you will see your stream in the stream list:

To begin monitoring your stream, click the  icon.
icon.